Making clear ice at home with tap water and directional freezing
Making clear ice at home is one of the things you can find many things about on the web. I have tried to follow so many things and tips from all over the web, boiling water, filtered water, both filtered and boiled water, special silicone molds, you name it. However learned that there is really just one method to make clear ice, especially when you want to make bigger quantities: directional freezing.
---
This "make clear ice at home page" is updated on the new website CasualFriday.Club. We are building a new site with even more tipps and tricks for your homebar expertise.
---
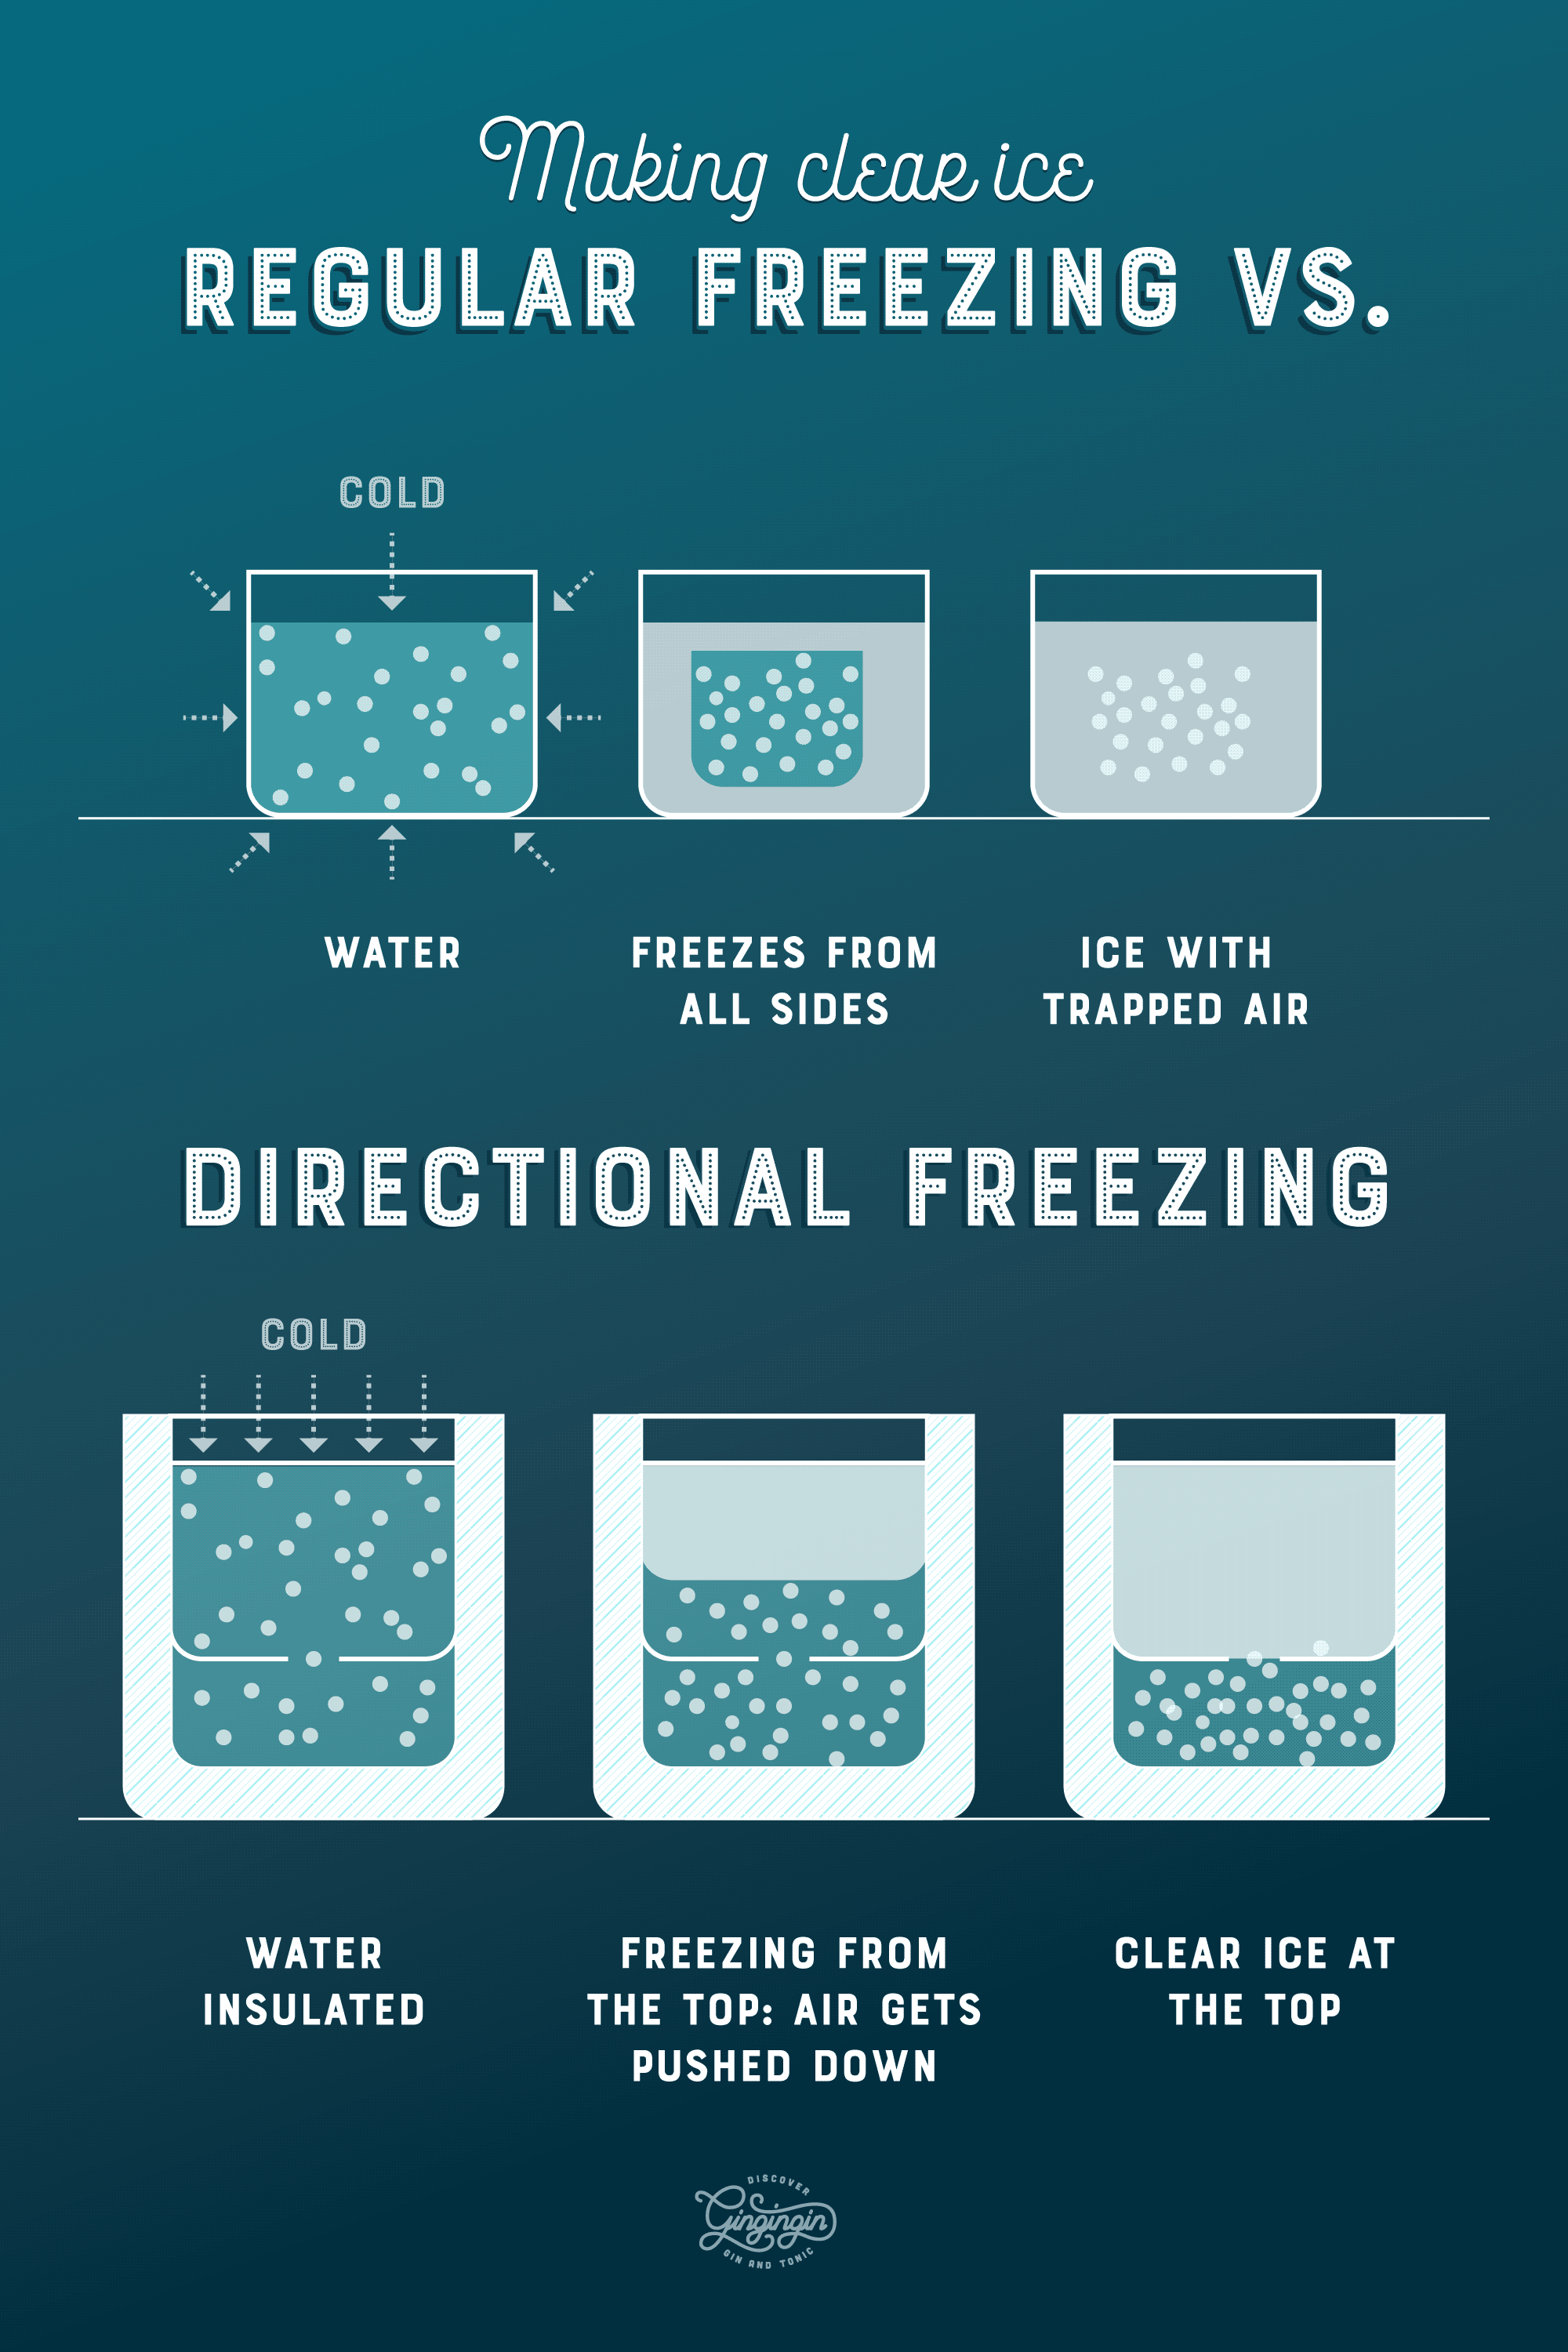
Why is your regular ice cloudy?
There are different reasons for cloudy ice. It could be that you have extremely hard water and that there is a lot of solved limestone in the water. Calcareous water is one reason. Add a few drops of acid like lemon juice and the water could get better.
But the main reason for cloudy, opaque ice is that there is a lot of air in the ice. Tiny bubbles which got trapped in the freezing process and were not pushed out. This air entrapment is the thing we want to avoid when making clear ice at home. So we will not freeze the water from all sides as it usually happens in your typical ice cube mold, but we want to freeze it from one side only so the air can make aside.
How does directional freezing work to create clear ice?
It is simple and something you might know from nature. A lake freezes in winter and the surface is super clear. That is what we are emulating in the freezer. The cold air freezes the first layer of water and creates a thin sheet of ice. Now the air which might be under the ice can still move downward or in a river is being pushed further down the stream underneath the ice. The cold air and first ice layer makes the water touching the ice freezes again, letting the air move downward or sideways. And this way the ice expands letting the air move downward further and further.
In a lake there is usually enough water so the bottom is still liquid and the air can stay under the ice. In a freezer we usually have only a few centimetres of depth available. And in a freezer the cold comes from all sides, not just from above as it is the case with the lake. So we need to make sure that our water in the freezer gets exposed to the cold from one side only by insulating the water container for ice making from all sides but the top.
 What do you need to make clear ice at home?
It took me a while to find the fitting items but you can basically choose anything similar.
a styrofoam box which fits into your freezer (no lid required)
a large container for the water, which fits exactly into the styrofoam box leaving no gaps for air to sneak in
Optionally silicone molds for cubes which need to fit into the water container. They should not be higher than 50% of the container’s height for the water.
a freezer
Optimally something to keep the silicone molds in the top half of the container.
I used the following items from amazon:
Two of the EMSA 3.7l boxes with lids (great to store your ice once it is ready as well) › See at amazon
A styrofoam box › See at amazon
4 ice cube molds › See at amazon
Step by step: make clear ice at home
Step 1: Preparing the styrofoam box
First make sure customise the styrofoam box in a way that the water container fits without any air gaps. I used the lid that came with the box to cut small pieces to squeeze between the box and the water container to seal it. Use a super sharp cutter to avoid the styrofoam from ripping and making a mess. Is the water container too big? Try melting bits of the styrofoam with a soldering iron. Do this outside it is not healthy to inhale the smoke and course all of this is without any warranties from me. Test the effect in a corner where it does not destroy your box right away. In general: Be careful, ask your parents if you are not, well let’s say 18, just to be safe :)
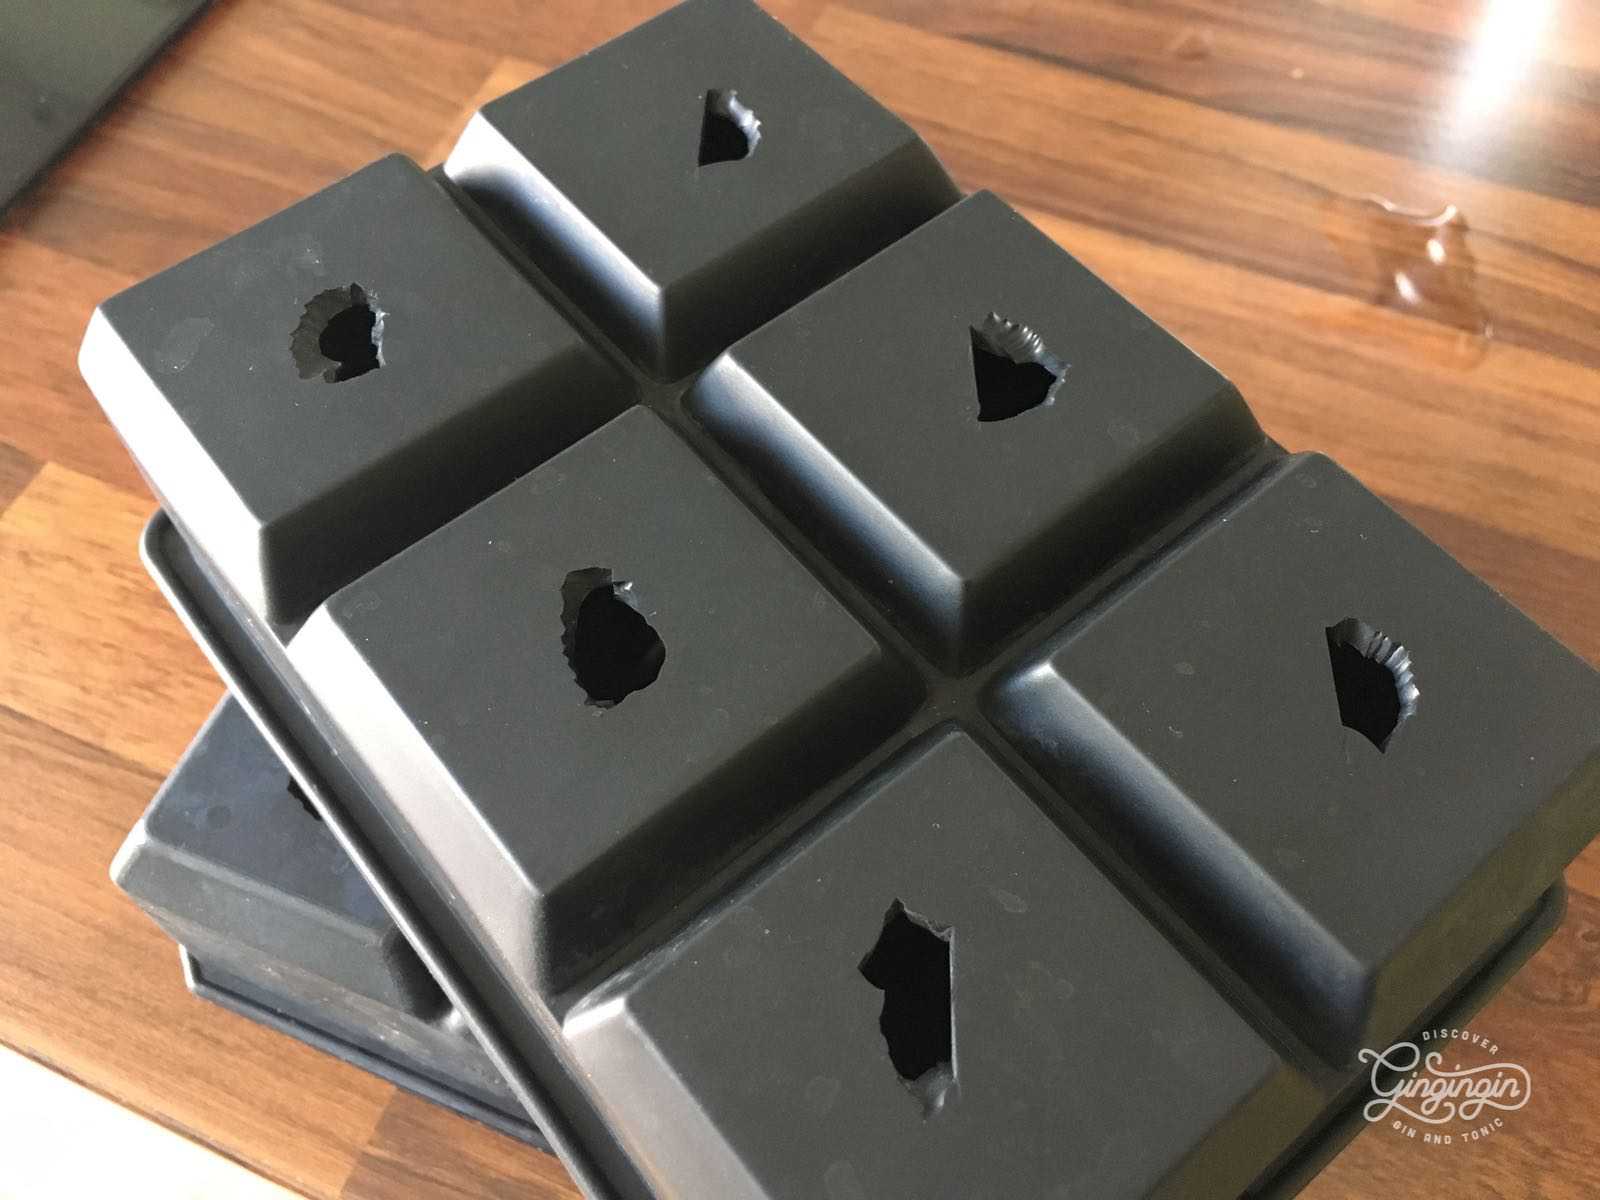
Step 2: Cut holes into each of the compartments of the silicone molds
The holes should be some 4-6 mm wide and not smaller because this is where the air bubbles which we do not want, will exit the cubes’ space. Too small holes might leave air in the cubes and make them cloudy.
 Step 3: Insert the silicone molds into the water container
Make sure you have something to keep the molds at the top of the water. I use small plastic bowls which fit perfectly. They are just 50 % of the water container’s height and the molds are 50 % as well.
Step 4: Add water from the filter or tap
No boiling required. Trust me this is something I tried for years and it is not worth the effort at all. Save time and energy.
Step 5: Place in the freezer and wait
In my case I need to wait for pretty much 23 hours. That is the moment when the cubes compartments in the molds are completely filled with ice but the water underneath is mainly still liquid. That is the point you want to figure out. A few timed test runs might be necessary.
Step 6: Take the ice and water out of the freezer
That's it. You should end up with amazingly clear ice cubes. Depending on the amount of water, insulation and cube size the duration might change.
A big box full of crystal clear ice cubes made at home without much effort.
 Optional Step 7: Cutting the clear ice
You did not use the silicone molds? No problem. Take the huge block of ice and water and make sure to pour the water out from underneath your ice layer. Now make sure any hin ice sheets on the sides are chucked away, then place the ice block onto a clean towel to avoid too much water being spilled all over the place.
I have experienced that a bread knife is great for cutting the ice. Maybe some silicone gloves are a good idea to a get a grip of the ice and prevent your skin from freeze burns (I know what I am talking about here). Saw long robs from the block and cut these into smaller blocks as you desire.
Storing your home made clear ice
To store your ice make sure you have a sealable box to place your ice cubes and rods in. It is important to have your ice away from other food that might transmit their aroma into the ice which can easily happen. You do not want your gin and tonic smell like fish, do you?! Ice just loves to attract and suck up odours and aromas from "the neighbours".
Why clear ice is better for drinks
Now if you have read so far, you might wonder why one would go through such tedious work only to get clear ice. Well first of all it looks super nice. Photos with clear ice make drinks a beauty. People will admire your ice cubes.
Clear ice makes a simple drink so much more adorable …
But the important physical aspect of the ice is not beauty, but melting properties. Clear ice has no cavities from air bubbles. For that reason the surface is very small and flat. That means less warmer drink touches the ice. That means the ice melts slower, dilutes the drink less, and does not drinks cool as much. In many drinks that is exactly what you desire. Just add another ice cube to cool the drink stronger. I was able to verify this, but not every time.
 Experiment: cloudy ice vs. Clear ice melting rache
Try placing a cloudy and a clear ice cube of the same size in water, same amounts, same temperature. See how differently they melt. I had different results. The only explanation I have for the almost similar melting speed occurrences is that the air bubbles offer some kind of insulation of the warmer water towards the inside of the cube.
Tips for using clear ice made at home
The clear ice is very solid and dense. It is quite resistant to Temperature differences, but it can crack and look only half way as nice when you take it from the freezer and immediately dump it in a drink or pour some warm drink over it. Let the ice sit for a moment until a thin letting water layer forms. That happens usually within a minute depending on the air temperature and will prevent most of the cracks.
Products for making clear ice
So far I have tried a few products to make clear ice. My biggest issues with them is that they either produce small amounts of ice (some just one ice cube, sphere, diamond), and many are simply not made for my freezer. Check exactly how tall these l be in the freezer as they usually only work when placed upright.
Share your clear ice
Let me know over on Instagram if you have made clear ice following these instructions or whether you have improved the procedure.

